What is the difference between HTTP and HTTPS?
HTTP (HyperText Transfer Protocol) is the underlying protocol browsers and websites use to communicate on the Internet. Created in 1989, it does not encrypt the data being sent between them. HTTPS (HyperText Transfer Protocol Secure) does the same job but adds encryption through an SSL or TLS certificate. This helps protect users and websites by protecting details like login information, payment information and form submissions.
In simple terms, HTTP is the unsecured version of a website, while HTTPS is the secure one. That difference matters because modern browsers treat them differently. If someone lands on the HTTP version of your site, they may see security warnings or reach a version that sends mixed signals to search engines. That can make your site feel less trustworthy to visitors while also making it harder for search engines to understand which version of the page should be treated as the main one.
Why redirect HTTP to HTTPS?
Redirecting HTTP to HTTPS makes sure every visitor reaches the secure version of your site straight away. That helps protect user data and reduces the risk of duplicate HTTP and HTTPS versions being indexed separately. This in turn creates a cleaner, more reliable experience for both users and search engines.
This is really about protecting each connection and making sure people get where they need to be without interruption. A proper HTTP to HTTPS redirect helps you do that in a clean, consistent way.
Understanding 301 redirects for HTTPS migration
A 301 redirect is the standard way to move traffic from HTTP to HTTPS permanently. It tells browsers and search engines that the secure HTTPS version is now the correct, long-term destination for your content.
This matters because a 301 status code means Moved Permanently. It helps search engines update their index to the HTTPS version and carry ranking signals from the old HTTP URLs to the new ones.
A 302 redirect, by comparison, signals a temporary move. That makes it a poor fit for HTTPS migration, because search engines may continue treating the HTTP version as the main URL instead of fully consolidating signals around HTTPS.
For best results, put your 301 redirects in place as soon as your SSL certificate is installed and working properly. That helps you avoid duplicate HTTP and HTTPS versions being accessible at the same time and gives search engines a clearer signal from the start.
SEO considerations for HTTP to HTTPS migration
Search engine optimization requires careful planning when implementing HTTPS redirects to preserve rankings and traffic. Google treats HTTP and HTTPS versions as separate sites initially, making proper redirect implementation crucial for maintaining SEO performance.
Submit updated XML sitemaps containing HTTPS URLs to Google Search Console and Bing Webmaster Tools after implementing redirects. This process helps search engines discover and index your HTTPS pages more quickly.
Monitor search performance during the transition period using Google Search Console. The Performance report shows how HTTPS migration affects click-through rates, impressions and average positions over time.
Internal link updates help consolidate SEO authority on HTTPS URLs. While redirects transfer most link equity, updating internal links to point directly to HTTPS URLs eliminates redirect hops and improves page loading times.
Canonical tags provide additional signals about preferred URL versions. Ensure that canonical tags on HTTPS pages reference HTTPS URLs to avoid sending conflicting signals to search engines.
Monitor for crawl errors and indexing issues during the transition period. Search Console's Coverage report identifies pages that search engines cannot access due to redirect problems or SSL certificate issues.
Security benefits of proper HTTPS implementation
HTTPS redirects provide comprehensive security improvements that protect both website owners and visitors. Data encryption prevents interception of sensitive information during transmission between browsers and servers.
Authentication benefits ensure that visitors connect to legitimate websites rather than malicious impostors. SSL certificates include verification information that browsers use to confirm site identity and prevent man-in-the-middle attacks.
Modern security features like HTTP Strict Transport Security (HSTS) require HTTPS to function properly. HSTS tells browsers to only connect via HTTPS, preventing downgrade attacks that might bypass redirect configurations.
Content integrity protection prevents tampering during data transmission. HTTPS ensures that the content users receive matches exactly what your server sends, preventing injection of malicious code or advertisements.
Compliance requirements in many industries mandate HTTPS for websites handling sensitive data. Proper redirect implementation helps maintain compliance with regulations like GDPR, HIPAA and PCI DSS.
How to redirect from HTTP to HTTPS
Apache htaccess method to force HTTPS redirect
The most common approach for implementing HTTP to HTTPS redirects involves modifying your .htaccess file on Apache servers. This method provides server-level control and works across your entire website without requiring individual page modifications.
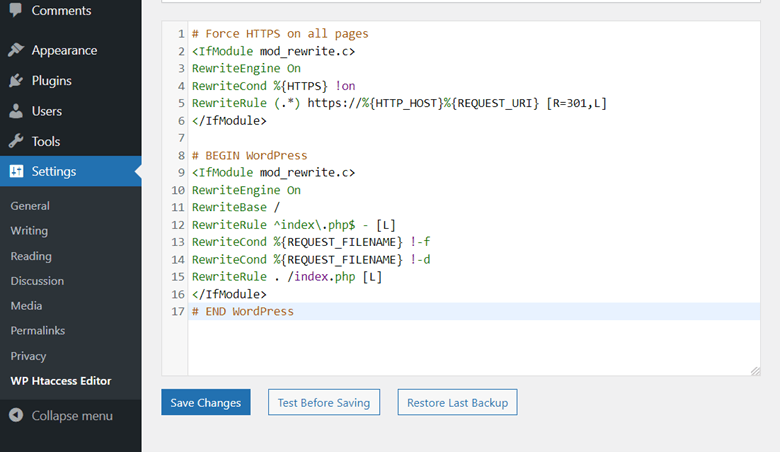
Open your .htaccess file located in your website's root directory and add the following code at the top:
<IfModule mod_rewrite.c>
RewriteEngine On
RewriteCond %{HTTPS} off
RewriteRule ^ https://%{HTTP_HOST}%{REQUEST_URI} [L,R=301]
</IfModule>
This configuration checks if HTTPS is disabled and redirects all HTTP requests to their HTTPS equivalents using 301 redirects. The `[L,R=301]` flags ensure that the redirect is permanent and that processing stops after this rule matches.
For websites using www subdomains, a more specific approach ensures consistent URL structure:
```
RewriteEngine On
RewriteCond %{HTTPS} off [OR]
RewriteCond %{HTTP_HOST} !^www\.
RewriteRule ^(.*)$ https://www.yourdomain.com/$1 [L,R=301]
```
This variation handles both HTTP to HTTPS redirects and non-www to www redirects simultaneously, preventing multiple redirect chains that can slow page loading times.
Always back up your original .htaccess file before making changes. Syntax errors in .htaccess files can cause server errors that make your website inaccessible until corrected.
Nginx server configuration for SSL redirect
Nginx servers require a different configuration syntax than Apache servers for implementing HTTP to HTTPS redirects. The configuration involves modifying your site's server block to include redirect directives.
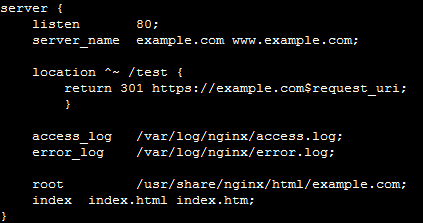
Add this server block to your Nginx configuration file to handle HTTP requests:
```
server {
listen 80;
server_name yourdomain.com www.yourdomain.com;
return 301 https://$server_name$request_uri;
}
```
This configuration listens on port 80 (HTTP) and issues 301 redirects to the HTTPS version using the same domain name and request path. The `$server_name` and `$request_uri` variables ensure that redirects preserve the original URL structure.
For more complex setups requiring specific subdomain handling, you can implement conditional redirects:
```
server {
listen 80;
server_name yourdomain.com www.yourdomain.com;
location / {
return 301 https://www.yourdomain.com$request_uri;
}
}
```
Remember to reload or restart Nginx after making configuration changes. Use `nginx -t` to test configuration syntax before applying changes to avoid service interruptions.
This Nginx pattern is commonly used for domain-wide HTTPS migrations because it returns a server-level 301 redirect before page processing, which keeps the redirect fast and consistent.
WordPress HTTPS redirect plugins
If you’re not comfortable with server-level configurations, you can also configure HTTPS redirects through WordPress. WordPress offers several approaches for implementing HTTP to HTTPS redirects.
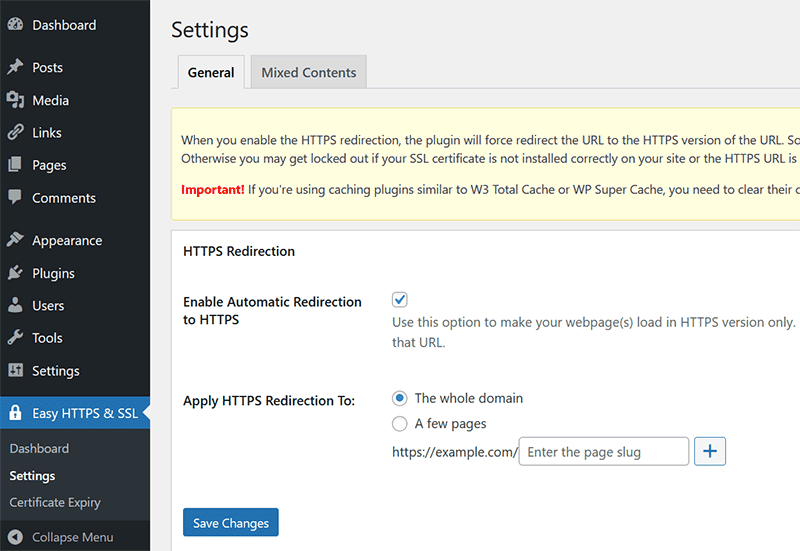
WordPress plugins provide user-friendly alternatives for non-technical users. Popular options include Really Simple SSL, SSL Insecure Content Fixer and Easy HTTPS Redirection. These plugins handle redirect implementation and often include additional features like mixed content fixing and SSL certificate monitoring.
For example, the plugin below allows you to configure HTTPS redirects for the entire domain with the click of a button.
When to use a centralized HTTPS forwarding tool
A basic server rule or WordPress plugin might be enough when you are managing one domain in one environment. But once you are handling multiple domains, migrations, replatforming work or redirect rules across different systems, things can get complicated quickly. Conflicting rules, redirect chains and inconsistent behavior are all common once changes start happening in more than one place.
That is where a centralized approach can help.
With urllo, we manage HTTP to HTTPS forwarding as part of a broader redirect strategy for more than 1,000 organizations worldwide. Instead of relying on disconnected rules across servers, plugins and platforms, urllo gives you one place to manage your redirects and forwarding behavior. This helps reduce the conflicting redirect rules that tend to build up over time and cause unnecessary chains.
This is especially useful when you need to:
- Forward all unsecured traffic to the secure version of a domain.
- Preserve the full request path during the redirect.
- Keep redirect behavior consistent across multiple domains.
- Reduce the risk of conflicting rules across platforms.
- Simplify redirect management during migrations or infrastructure changes.
How to HTTPS forward with urllo
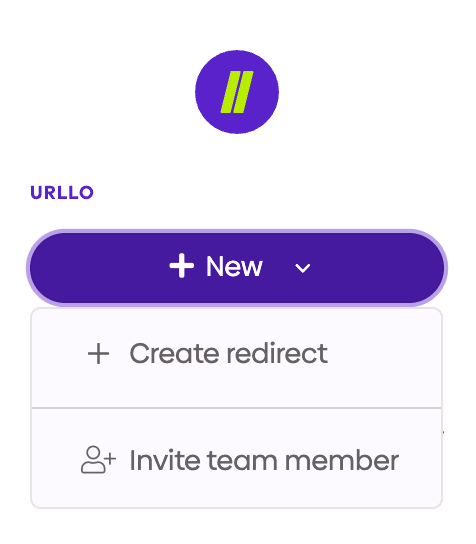
Once you’re in dashboard.easyredir.com, click the "+ New" button and select "Create redirect".
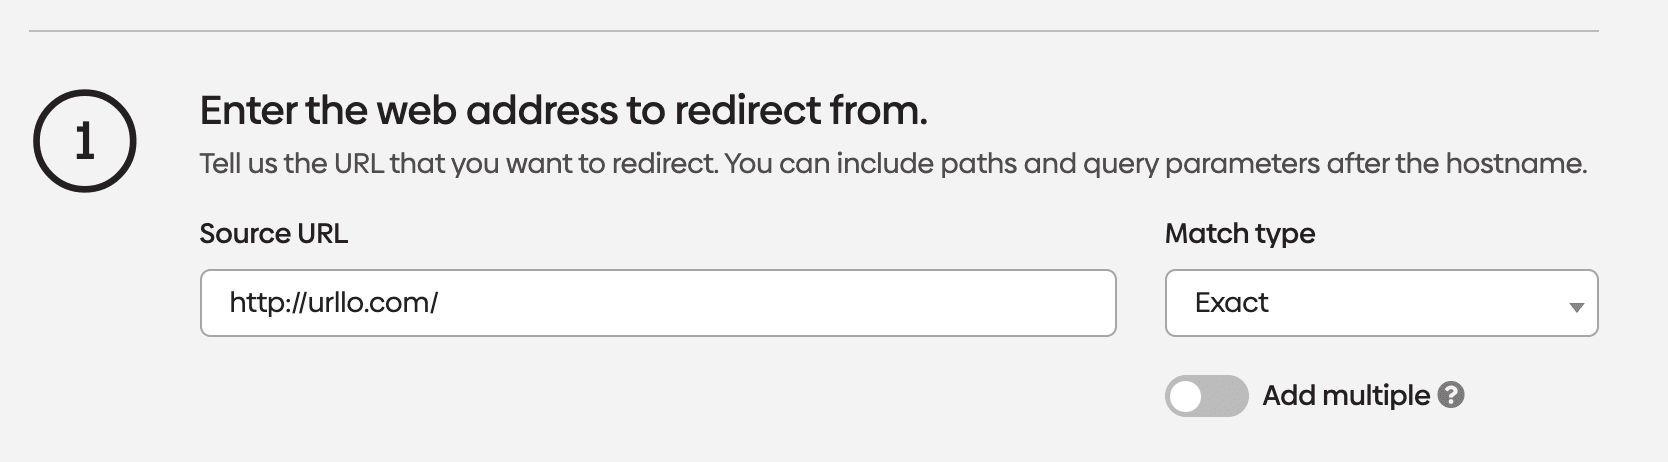
In the "Source URL" field, enter your HTTP domain (e.g. http://yourdomain.com). Leave the "Match type" set to "Exact".
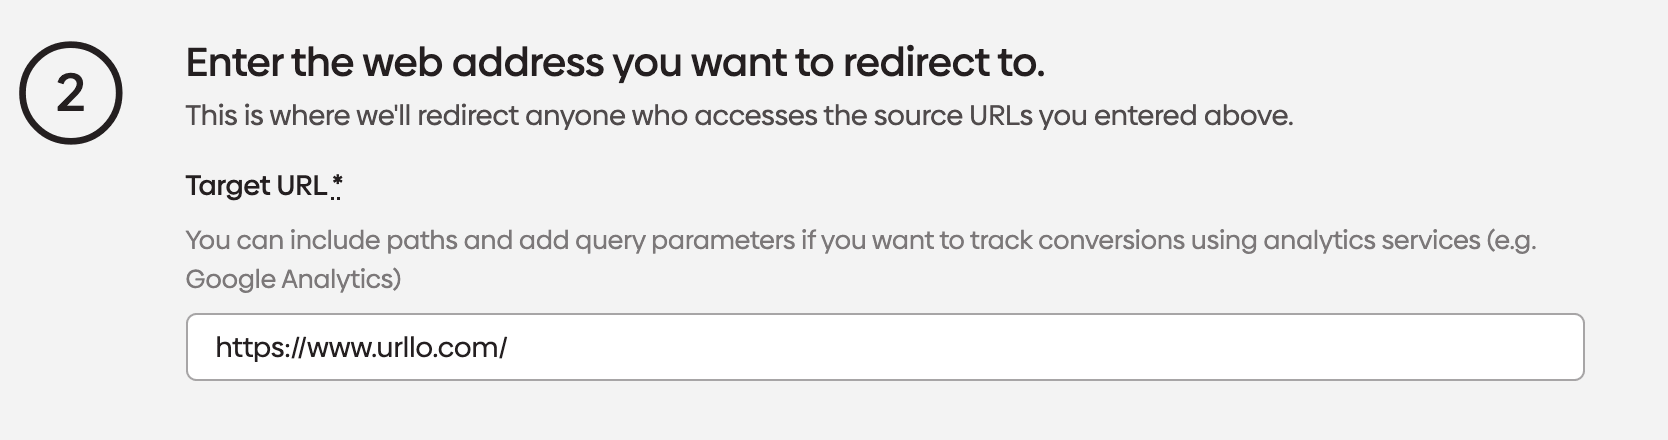
In the "Target URL" field, enter the same domain using HTTPS (e.g. https://yourdomain.com).
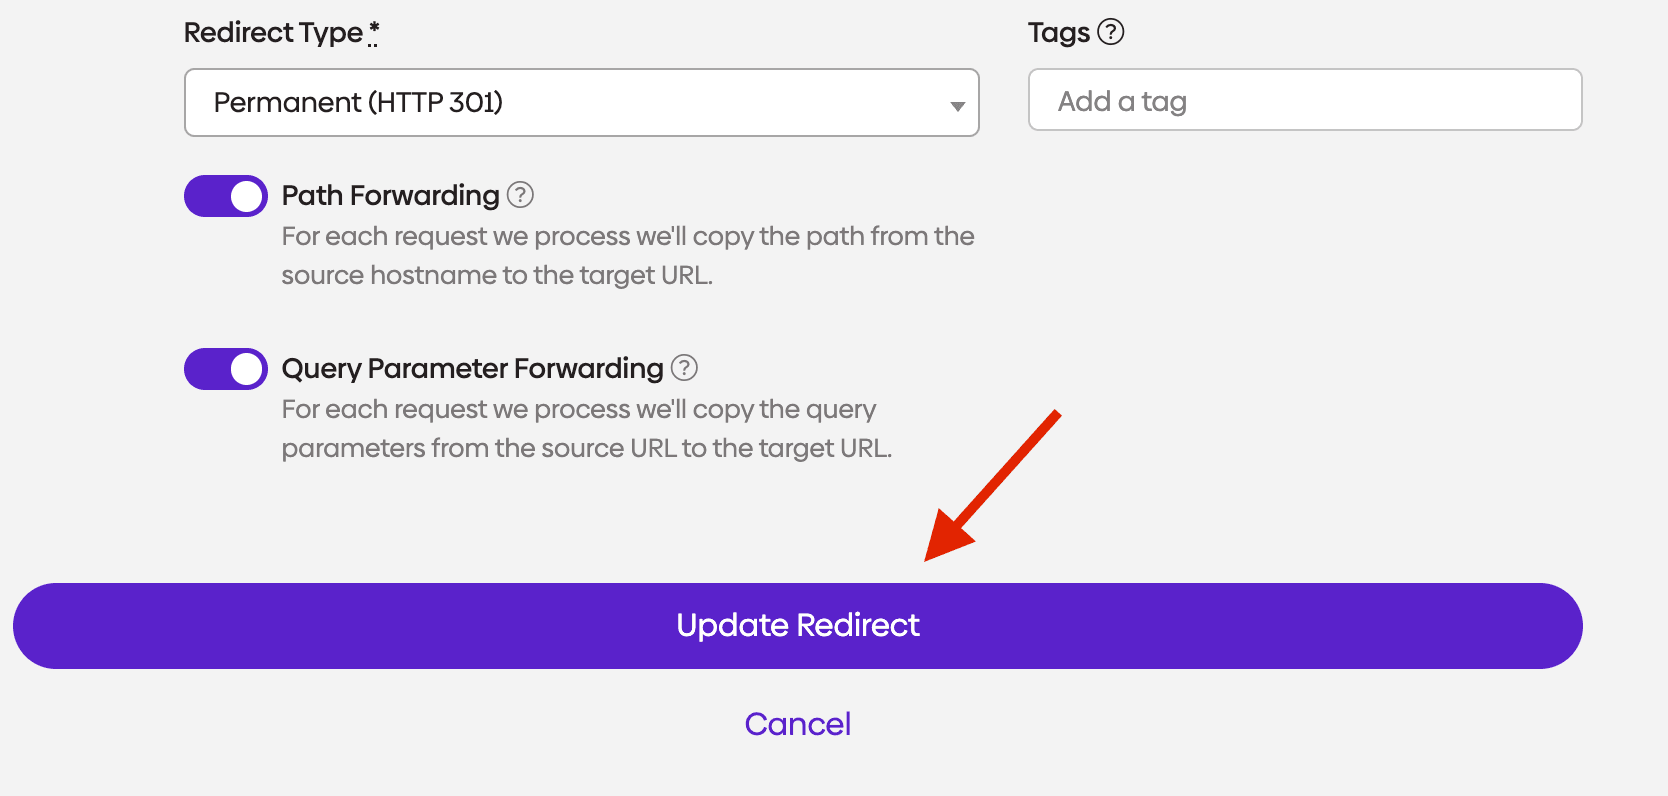
Next, set the "Redirect Type" to "Permanent (HTTP 301)" and make sure both "Path Forwarding" and "Query Parameter Forwarding" are enabled.
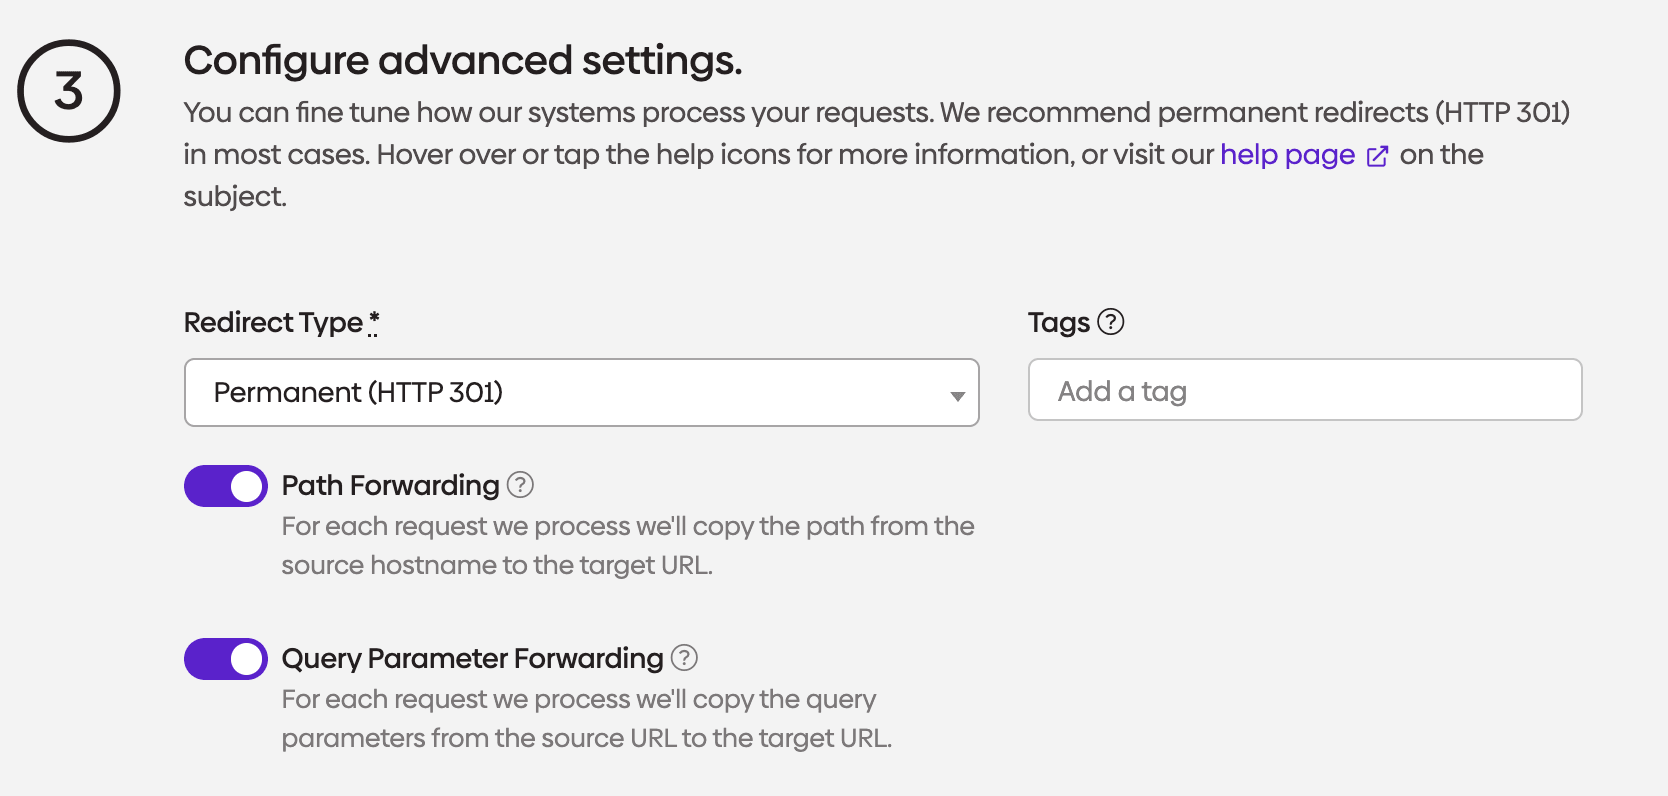
Finally, click "Update Redirect" to save your settings and your HTTP-to-HTTPS redirect is ready to go!
Cloudflare redirect rules
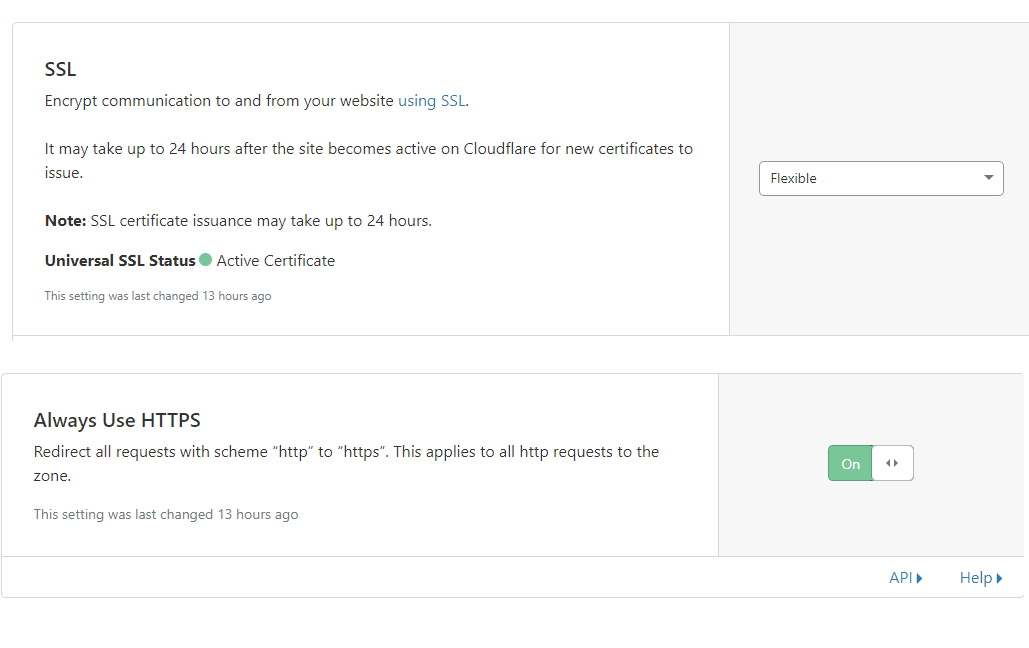
Cloudflare users can implement HTTPS redirects through the dashboard without modifying server configurations. Navigate to SSL/TLS > Edge Certificates and enable "Always Use HTTPS" to automatically redirect all HTTP requests.
For more granular control, Cloudflare's Page Rules feature allows custom redirect configurations. Create a new page rule with the pattern `http://yourdomain.com/*` and set the action to "Always Use HTTPS" for comprehensive coverage.
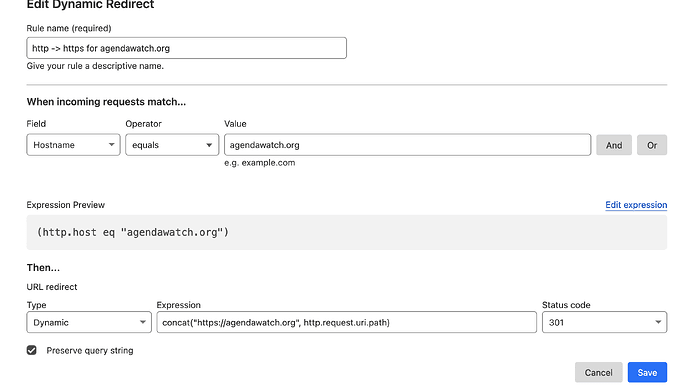
Cloudflare's Bulk Redirects feature handles complex redirect scenarios involving multiple domains or specific URL patterns. This tool supports up to 20,000 redirect rules per zone, accommodating large-scale HTTPS migrations.
cPanel and hosting control panels
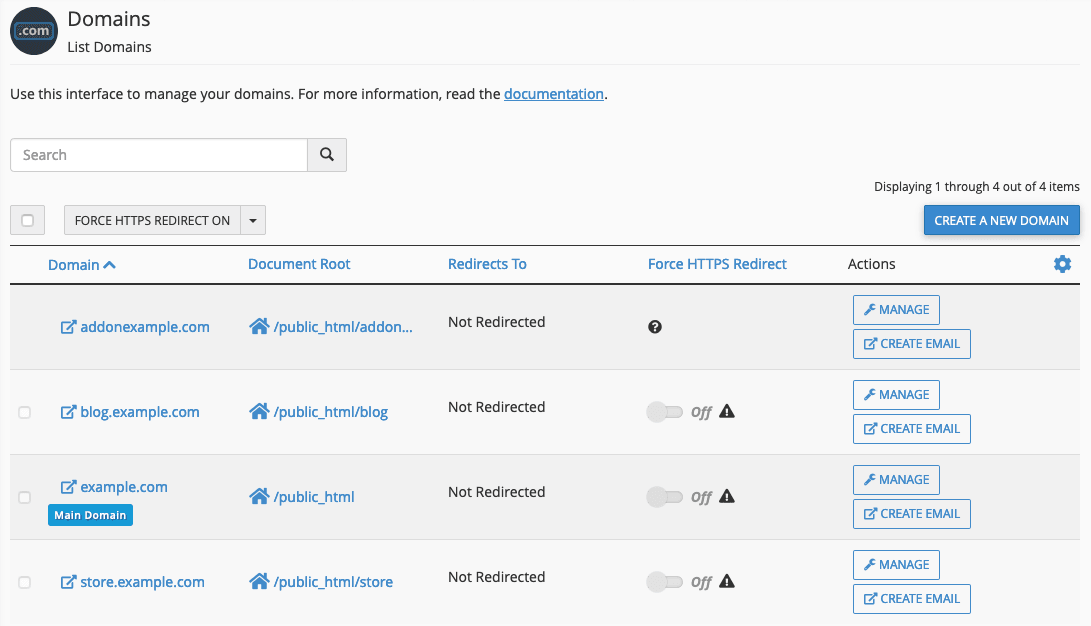
Many shared hosting providers include one-click HTTPS redirect options in their control panels. Look for "Force HTTPS Redirect" or similar options in your hosting account's SSL/TLS management section. This is usually the simplest way to send HTTP traffic to HTTPS without editing server configuration files.
If you need custom source/destination pairing, cPanel users can access the "Redirects" tool to create HTTP to HTTPS redirects through a graphical interface. Select "Permanent (301)" as the redirect type and configure the source and destination URLs appropriately.
Some hosting providers automatically implement HTTPS redirects when SSL certificates are installed. Check your hosting documentation or contact support to confirm automatic redirect policies before implementing manual solutions.
Testing and troubleshooting HTTPS redirects
Before deploying changes sitewide, test redirects on a staging environment or during a low-traffic window. Misconfigured HTTPS rules can create redirect loops, break admin access or interfere with CDN and proxy behavior.
Proper testing ensures that your HTTP to HTTPS redirects function correctly across different scenarios and devices. Use an online tool like urllo’s redirect checker to verify that redirects return proper 301 status codes.
Browser testing should include multiple browsers and devices to identify potential compatibility issues. Clear browser caches before testing to ensure accurate results, as cached redirects might not reflect recent configuration changes.
Common troubleshooting issues include redirect loops, mixed content warnings and incomplete redirect coverage. Redirect loops occur when HTTPS URLs redirect back to HTTP versions, creating infinite redirect chains that browsers block.
Mixed content issues arise when HTTPS pages load HTTP resources like images, scripts or stylesheets. Modern browsers block these resources, causing functionality problems and security warnings.
HTTPS migration implementation checklist
Before you make your HTTP to HTTPS redirects live, run through this checklist to avoid broken pages, redirect loops and SEO issues during the transition.
1. Confirm your SSL certificate is installed and valid
Make sure your SSL certificate is active for your primary domain and any hostname variations you use, such as www and non-www. Your HTTPS redirect should not go live until the certificate is properly installed, trusted by browsers and not expired.
2. Choose one preferred canonical domain version
Decide whether your site should resolve to:
- https://yourdomain.com
- https://www.yourdomain.com
Use that version consistently across redirects, canonical tags, sitemaps and internal links. This helps prevent duplicate content issues and avoids unnecessary redirect chains.
3. Implement a permanent 301 redirect from HTTP to HTTPS
Your redirect should send every HTTP URL to its exact HTTPS equivalent using a 301 permanent redirect. This preserves the page path and passes SEO value to the secure version.
For example:
http://yourdomain.com/about → https://yourdomain.com/about
http://www.yourdomain.com/pricing → https://www.yourdomain.com/pricing
Avoid redirecting all requests to the homepage, as this can hurt usability and search performance.
4. Eliminate redirect chains
Each URL should resolve in a single step whenever possible.
A visitor should not go through multiple hops like this:
http://yourdomain.com → http://www.yourdomain.com → https://www.yourdomain.com
Instead, send traffic directly to the final preferred version:
http://yourdomain.com → https://www.yourdomain.com
This improves page speed, crawl efficiency and overall user experience.
5. Update internal links to HTTPS
Once redirects are in place, update your internal navigation, footer links, buttons, image URLs, CSS, JavaScript references and hard-coded content links so they point directly to HTTPS. Redirects will still work, but direct HTTPS links reduce unnecessary requests and reinforce the preferred version of your URLs.
6. Update canonical tags
Check that every canonical tag references the HTTPS version of the page. If your canonical tags still point to HTTP URLs, search engines may receive mixed signals about which version should be indexed.
7. Update your XML sitemap
Generate and submit an XML sitemap that contains only HTTPS URLs. Remove any HTTP versions from the sitemap to help search engines crawl and index the secure version of your site more efficiently.
8. Verify your HTTPS property in Google Search Console
Add and verify the HTTPS version of your site in Google Search Console. If you use URL-prefix properties, make sure the secure version is included. After launch, submit your updated sitemap and monitor indexing, crawl errors and performance changes.
9. Check for mixed content issues
Review your pages for assets that still load over HTTP, including:
- Images.
- Scripts.
- Stylesheets.
- Fonts.
- Embedded media.
Mixed content can trigger browser warnings or cause some resources to be blocked entirely, which can break layout or functionality on HTTPS pages.
10. Test key page types before and after launch
Check more than just your homepage. Test:
- Homepage.
- Main category pages.
- Blog posts.
- Product or service pages.
- Login pages.
- Forms.
- Checkout pages if applicable.
Confirm each HTTP URL redirects correctly to the matching HTTPS page and that the destination page loads without errors.
11. Test redirect response headers
Use a browser extension, redirect checker or command line test to confirm the redirect returns a proper 301 status code.
Example:
curl -I http://yourdomain.com
You should see a 301 Moved Permanently response and a Location header pointing to the HTTPS version.
12. Review robots.txt and other technical SEO settings
Make sure your robots.txt file, hreflang tags, structured data references and any SEO plugin settings are updated to use HTTPS URLs where needed. These details help keep your migration technically consistent.
13. Recheck CDN, proxy and caching settings
If you use Cloudflare or another CDN, confirm that SSL mode, redirect rules and caching behavior support your HTTPS configuration. In some setups, conflicting origin and edge rules can cause redirect loops or inconsistent behavior.
14. Monitor after launch
After publishing your redirects, monitor:
- Google Search Console coverage and performance.
- Crawl errors.
- Redirect errors.
- Certificate warnings.
- Mixed content warnings.
- Traffic and conversion trends.
Some ranking fluctuation is normal during migration, but persistent crawl or indexing problems usually signal a redirect or canonical issue that needs to be fixed.
15. Keep the redirects in place long term
Do not remove your HTTP to HTTPS 301 redirects after a few weeks. Keep them active permanently so users, backlinks and search engines always reach the correct secure version of your site.
Secure your website with an HTTPS domain forwarding
Implementing proper HTTP to HTTPS redirects represents a fundamental requirement for modern website security and SEO performance. The methods outlined in this guide provide comprehensive coverage for different hosting environments and technical requirements.
Starting with basic htaccess redirects or platform-specific solutions provides immediate security benefits while establishing the foundation for advanced HTTPS features. Regular testing and monitoring ensure that redirects continue functioning properly as your website evolves.
The investment in proper HTTPS redirect implementation pays dividends through improved search rankings, enhanced user trust and robust security protection. Taking action to redirect HTTP traffic to HTTPS creates a more secure, performant and search-friendly website that meets modern web standards.
Frequently asked questions about HTTP to HTTPS domain forwarding
What is the difference between 301 and 302 redirects for HTTPS?
A 301 redirect indicates a permanent move and transfers SEO value from HTTP to HTTPS URLs, making it the correct choice for HTTPS migration. A 302 redirect signals a temporary move and doesn't transfer link equity, potentially harming your search rankings during the transition.
How do I redirect HTTP to HTTPS in htaccess?
Add this code to your .htaccess file: `RewriteEngine On`, `RewriteCond %{HTTPS} off`, `RewriteRule ^(.*)$ https://%{HTTP_HOST}%{REQUEST_URI} [L,R=301]`. This creates a 301 redirect that automatically sends all HTTP traffic to the HTTPS version of your site.
Will redirecting HTTP to HTTPS affect my SEO rankings?
Properly implemented HTTPS redirects using 301 redirects typically improve SEO rankings since HTTPS is a confirmed Google ranking factor. You may experience temporary fluctuations during the transition period, but long-term benefits include better rankings and increased user trust.
How do I test if my HTTP to HTTPS redirect is working?
Use online redirect checker tools or test manually by entering your HTTP URL in a browser and confirming it redirects to HTTPS. You can also use the command `curl -I http://yourdomain.com` to see the redirect headers and verify a 301 status code response.
Can I redirect HTTP to HTTPS without htaccess access?
Yes, many alternatives exist, including WordPress plugins, Cloudflare settings, hosting control panel options and server-level configurations through cPanel or other management interfaces. Content management systems often provide built-in HTTPS redirect functionality.
What happens if I don't redirect HTTP traffic to HTTPS?
Without redirects, users can access both HTTP and HTTPS versions of your site, creating security vulnerabilities and SEO problems. Search engines may index both versions as separate sites, diluting your SEO authority and potentially triggering duplicate content penalties.

By Sean Pasemko
SEO & Growth Marketing Specialist
Sean Pasemko is an SEO and growth marketer at urllo, where he works closely with SEO, IT and WebOps teams on redirect management, domain changes and site migrations.
His writing draws on practical experience analyzing redirect behavior, crawl efficiency and long-term site maintenance to help teams avoid common routing and performance issues.